8.1 KiB
Process
This document is to describe the internal process that the Ionic team uses for issue management and project planning.
Table of contents
Project Boards
The project boards are located under the Projects tab in GitHub: https://github.com/ionic-team/ionic/projects/
Core Project Board
The Core project board contains issues related to the @ionic/core package. A description of each column is below.
Backlog 🤖
Contains up to 20 issues that are important to work on soon but we don't think we can fit in the current sprint. If we finish everything we planned for the week we can pull from this column. Issues will automatically move to this column when they are added to the project board.
On Deck ⚾
Contains issues that we believe we can accomplish in the current sprint. Issues should be manually moved to this column when we have our sprint planning meeting.
In Progress 🤺
Issues and pull requests that are currently being worked on. Issues should be manually moved to this column and assigned to yourself when you begin working on them. Pull requests are automatically added to this column when added to the project board.
Needs Review 🤔
Issues and pull requests that need review. Pull requests will automatically move here when a reviewer requests changes, or it no longer meets the minimum number of required approving reviews.
Done 🎉
Issues and pull requests that are completed. Issues will automatically move here when they are closed. Pull requests will automatically moved here when they are merged or closed with unmerged commits.
Managing Issues
Issues to Triage
The issues that need to be triaged all have the triage label. In many cases the issue can be automatically processed by the Ionic Issue Bot by applying a specific label.
Once another label is applied to the issue, the triage label is automatically be removed by the bot.
Wrong Repo
If an issue does not pertain to the Ionic Framework but does pertain to another repo, it should be moved to that repo. The bot has been set up to automatically create the issue in other repositories while closing and locking the issue in this repository. Use one of the following labels to perform that action:
- ionitron: cli
- ionitron: docs
- ionitron: stencil
- ionitron: native
Ionic Pro Issues
If the issue is associated with Ionic Pro the submitter should be told to use the Ionic Pro Support Forum. The issue should be closed and locked. Use the ionitron: ionic pro label to accomplish this.
Support Questions
If the issue is a support question, the submitter should be redirected to our forum or slack channel. The issue should be closed and locked. Use the ionitron: support label to accomplish this.
Incomplete Template
If the issue template has not been filled out completely, the issue should be closed and locked. The submitter should be informed top re-submit the issue making sure they fill the form out completely. Use the ionitron: missing template label to accomplish this.
Issues with Open Questions
In many cases, the template is mostly filled out but just missing a thing or two or you may have a question or need clarification. In such a case, the submitter should be asked to supply that information.
- create a comment requesting the additional information or clarification
- add the
needs replylabel to the task
NOTE: be sure to perform those actions in the order stated. If you add the comment second it will trigger the removal of the label.
If there is a response to the question, the bot will remove the needs reply and apply the triage label. The issue will then go through the triage handling again.
if there is no response within 30 days, the issue will be closed and locked.
Workflow
We have two long-living branches:
master: completed features, bug fixes, refactors, choresstable: the latest release
Examples
Making a Change
-
Create a branch from
master. -
Make changes. Limit your changes to a "unit of work", meaning don't include irrelevant changes that may confuse and delay the change.
-
Push changes.
-
Create a PR with the base of
master. -
Have someone approve your change (optional right now--at your discretion).

-
Wait for status checks to succeed. Fix errors if any occur.

-
Click Squash and merge. Use the dropdown to select this option if necessary.

-
During confirmation, rewrite the commit message using our Commit Message Format guidelines. Keep the
(#1234)at the end; it will create a link to the PR in the commit history andCHANGELOG.md. This is where commits onmasterbecome permanent.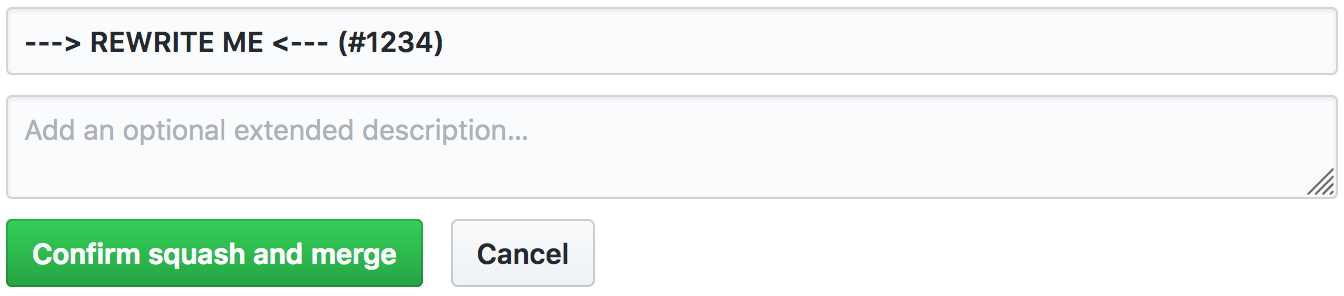
-
Confirm squash and merge into
master.
Merging Changes from master into your Branch
- Pull the latest changes locally.
- Merge the changes, fixing any conflicts.
- Push the merged changes.
OR
-
Click Update branch on the PR:

-
Pull the merged changes locally.
Making a Release
-
Freeze
master. Only the person doing the release should be modifyingmaster. -
Follow the Making a Change steps to prepare the release.
- Run
npm run release.prepare - Version changes
CHANGELOG.MDtweaks
- Run
-
Create a PR to merge
masterintostable. -
Click Merge pull request. Use the dropdown to select this option if necessary. This will preserve the commit history from
masterby creating a merge commit.
-
CI builds
stable, performing the release. -
Unfreeze
master.
Hotfixes
Hotfixes bypass master and should only be used for urgent fixes that can't wait for the next release to be ready.
-
Create a branch from
stable. -
Make changes.
-
Run
npm run release.prepare. -
Push changes.
-
Create a PR, making sure the PR will merge into
stable. -
Click Squash and merge. Use the dropdown to select this option if necessary.
-
During confirmation, rewrite the commit message using our Commit Message Format guidelines. Keep the
(#1234)at the end; it will create a link to the PR in the commit history andCHANGELOG.md. This is where commits onmasterbecome permanent.
-
Confirm squash and merge into
stable. -
CI builds
stable, performing the release. -
Create a PR to merge
stableintomaster. -
Click Merge pull request. Use the dropdown to select this option if necessary.